December 31, 2011

Image Stacking a new structure

Recently I've been experimenting with a macro lens and image stacking.  Below are two images produced with Zerene Stacker and a 100mm Macro lens, each image was built from 7 exposures, each with slightly different focus.  In the close up you can just make out the switch controls inside the building, and the two operators standing at their levers.

The signal tower below is a Faller kit, part of my Christmas loot horde, which I doubtlessly will be gloating about in a future post. Santa was good to me, I have good friends who know me well.  Thanks!

Click for higher res


December 12, 2011

A bit of fun...


Inspired by the excellent videos on some of the other blogs I did a little one of my own.  Next time I'll use a proper camera and not my phone, and try to actually show something perhaps.  I hope this makes you smile nonetheless.

December 10, 2011

My German crocodile has arrived! The Fleischmann FL-739401 E94


The E94 with the new decoder installed.  I used an ESU LocPilot Micro 3.0 with a 6 pin plug on a wire harness.  Fitting a decoder with the plug mounted on the decoder body is impossible with this engine.   Even with the plug harness, it's a tight fit because of the length of the wires, but it works.  I could have trimmed them down and soldered them back onto the plug but carefully squishing it in there proved much easier.

It's a smooth runner though mechanically rather noisy.  Perhaps all those gears needed to drive 8 wheels on a three part articulated body? When running at speed there are vibration noises, as well as substantial gear noise.

Happily, all that noise seems to fit the engine, it being a 1930's electrical  behemoth!  Note the light weathering on the trucks and grills.  If you look at my images posted earlier you will see these were previously all black.  I like to dry brush some grey highlights and then spot some grimly black on the lower surfaces, nothing too extreme, but I like to bring out the details.

The trouble with weathering is once I start I tend to get carried away.  I have a brush in hand and just look for something else to paint! When you have a hammer every problem looks like a nail...  This poor little boxcar took the brunt of my creative enthusiasm. 


December 8, 2011

A Little Background

My first attempt with a background.  It's good from afar but sadly far from good.  I did a poor job and wound up with air bubbles and creases.  I found the wallpaper glue left me with very little working time, ah well.  On my next attempt I will probably just tack it in place.  Anyhow, despite the bubbles I think you will agree that it's an upgrade versus the bare walls:


December 2, 2011

Minitrix 12619: BR Class 58


This was a Christmas present from my wife in 2010.  It is a very smooth performer, one of my best running locomotives.   It starts very reliably and can crawl along with the best of them. The DCC install was a very simple plug and play job, once some small screws are located under the tender.  The headlights are under powered, it is hard to see the illumination, even in a dark environment.  The rear lights are very clear however.  I did contemplate opening this up and looking for trouble with the front lights but all the mechanism is in the boiler, (the tender houses the decoder only), so I decided not to press my luck.  The parts diagram makes clear that there's an awful lot going on in there. and this is no simple plastic shell diesel body.  If you look back a few posts you'll see a silly video I made in which this engine is featured prominently.  

The German class 58 was built in 1920, taken out of service in 1953.  It does not really belong on my Swiss layout, but it'f of the right period and region so it's not too far off either.  


The manufacturer says: Locomotive and tender made of diecast metal. High efficiency motor with flywheel. Close coupling between locomotive and tender. Motor and gear drive in the boiler. Digital connection in tender.  5 axles powered through side rods, 2 traction tires.


Fleischmann E94 DCC Blues: I chicken out! (FL-739401)

I got a new locomotive today!  I've really been holding back on new acquisitions for some time now but the lure of Black Friday prices and 1920's electrics won me over.  It is a Fleischmann E94, (model FL-739401).   


As pictured in the catalog

I happily unboxed and and took a quick picture or two with a macro lens to show the detail:


Thus far all is well, but now onto the tricky bit: the DCC install.   Opening this up was no problem, but look at the space for the decoder!


The weight lifts out and in fact you are obliged to remove it permanently with any decoder installed.  I'm not keen on that but I can live with it.  Given my inclines more tractive power is a good thing, but with 8 wheels driven I should be okay.  Bot look at the space provided!  That is space for a plug, not a decoder.   The decoder must be seted above, where the weight is.  This is not ideal.  I had a plan.  I had a nice ESU Lokpilot Micro ready and waiting.   I planned it!  

Not to be deterred, I popped it in just to run the locomotive about a bit and get a sense of how it runs (and it runs well, a proper review will follow).  


Well, this is not quite ideal...
Sadly, with that chip sticking out I didn't have clearance for my tunnels and I found myself worrying that I might glace away at a key moment and have it go smacking into stonework so it's run tonight was quite limited.
  
I contemplated snipping the DC placeholder plug in half and using it's terminals to solder wires that I could then solder to my decoder.  I considered my experience of doing similar surgery to a CE 6/8 and the hours of frustration that entailed.  While it all wored in the end, I had to conclude it was not worth the grief.  So, now it's $40 later and I've ordered a new decoder with a prewired plug, it should arrive next week and the install will be the trivial experience I had anticipated. 

What will become of my E94?  Click here to find out!

Here's what Fleischmann has to say about this model:

Electric loco of the DRG, class E 94 (2008 Limited Edition)
Overall length: 116 mm. Super-detailling, -livery and -lettering. Inset windows. Interior details in driver’s cab. Sprung pantographs. Current pick-up from the rails or overhead catenary. Cast metal chassis. Motor with flywheel. With standard NEM 651 socket for installation of a decoder. Drive on 8 wheels, of which 2 are fitted with traction tyres. Double headlights at each end, co-ordinated with the direction of travel. Automatic couplings at each end. Slot-guide mechanism at each end for true close coupling by using the PROFI-coupling 9545 (delivered with standard couplings). Standard NEM 355 coupling socket. Epoch II

Once I'm properly setup I'll post my thoughts on this.   So far, I'm impressed with the appearance and disappointed it did not accept the decoder I had on hand.

November 26, 2011

Beauty Peel: Before and After

Today I added a second and third layer of flocking, filled some patches, painted my retaining wall, and some new textures about the tracks.  Then after a few hours of drying time I peeled away the masking materials.  Boom!  Everything suddenly looks better!   This is such a fun time in the whole process.   One thing that struck me how shiny my rails are.  I've always planned to weather them but never flet an urgency before.

Before
After

Under Wraps
Voila!
Where's the track?
Ta-Da!

Before
I used an unfortunately wide tape here, but it's easily corrected.

Look how shiny it is!   I must weather this soon!


Bonus geekery: Can you spot the TARDIS?  She's in two of the above...

November 23, 2011

Get Flocked!

Applying ground cover flocking is like magic!  Suddenly my plaster cloth landscape has lept to life.   I've just started mind you, there's lots of layers and detailing to come, but tonight I applied a base coat to a hill section and I just love it.   As you view these images please remember it's a work in progress, the best is yet to come!


November 22, 2011

A few coats of paint later....

Progress on my rock wall, using very diluted paints and a spray bottle.  Not a method for the faint of heart!  Sure, the walls will never be quite the same again, but the eventual backdrop will hide all, right?

A thin coat of black, then grey, then water to blur it all together:


After some drying time I brushed on grimy black on the brightest surfaces, plus deep into cracks and on the undersides of rocks to add some depth.  Then I applied a thin coat of light grey, then more black, then a little white and a big water wash...   We'll see how this dries.  Matching the existing rock may prove to be trouble...


And finally, a day later and a new coat of lighter grey highlights and suddenly it all looks better!


November 21, 2011

Quick Kit Review: Kibri 37032 Church of the Gotthardbahn


Design:  The kit is well designed.  It appears to be a modern mould, the visible seams are minimized when assembled, the flash is minimal and the sprunes had adequate trimming space.  Rating: A

Quality:  The walls are unusually thick, much more so then is the norm in N scale structures and the thin parts are about as good as one gets in a modern 1:700 scale ship (ie. impressively thin).   I was pleasantly surprised. The factory colours are not to my taste, but I never build an unpainted kit so a non issue for me. The Photo on the box suggests a common blue hue for the dome and stonework which is misleading, as they are cast from separate plastics, one green, the other grey.  Rating: A

Documentation:  Typical of Kibri the documentation is a little lacking.  The parts are numbered from 7000 to 8000 over several sprunes, rather then the standard A1, A2, A3...B1, B2, B3... and the instructions are a series of images that cram too much detail into too few panels.   It's not unbuildable, clearly, but it's not on par with a modern Faller kit either.  Rating: C

Decals and Details:  The decal sheet does not match the decals illustrated in the instructions.  The instructions on the window decals are not very clear, but the effect once used correctly is impressive.  The windows are a translucent yellow with a crosshatch which looks great.   The snowbreaks on the roof are finely moulded.  Rating: B

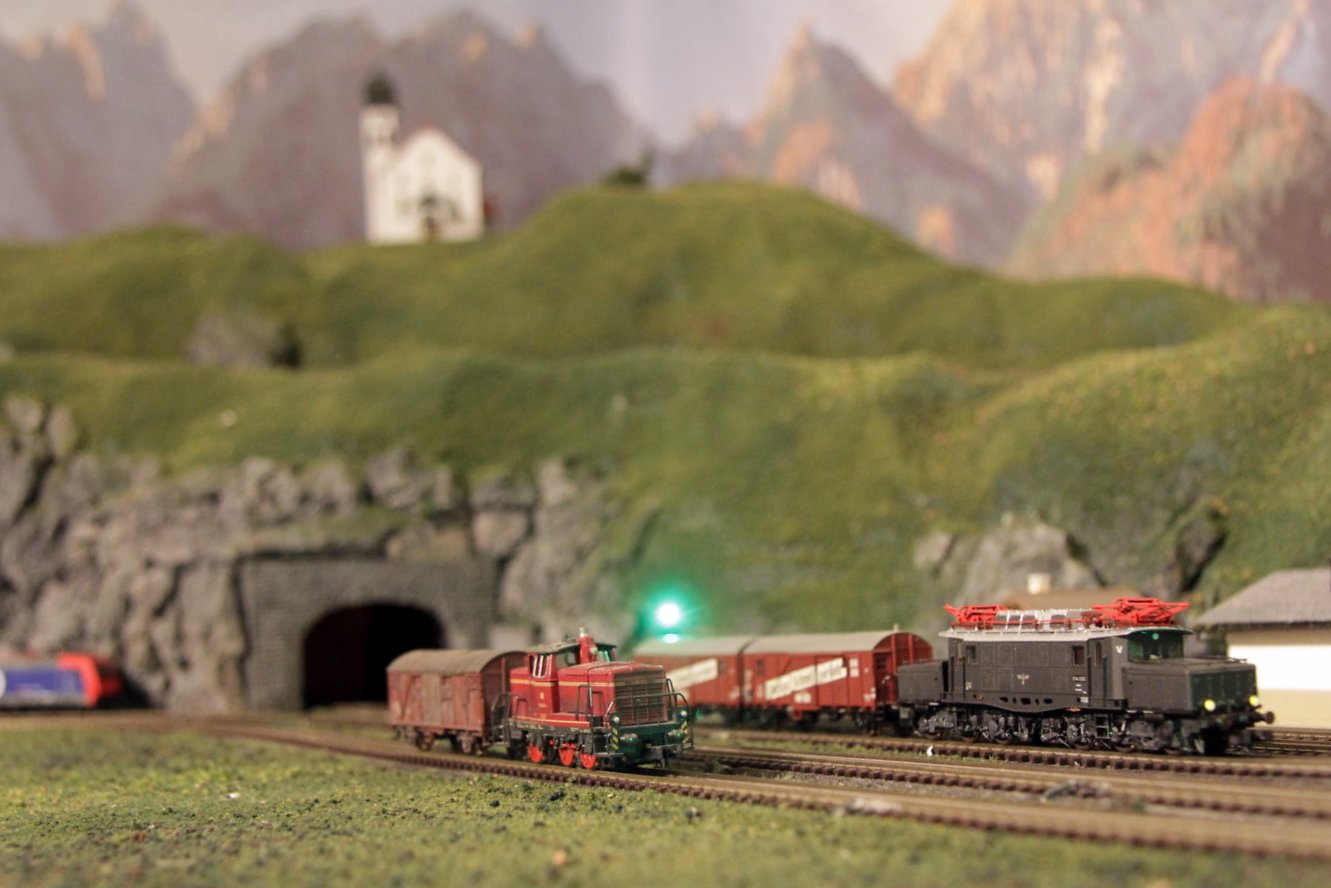
Build:  I'm very pleased with how this came out.  The church makes an impressive structure, looks great, and fits my chosen subject area perfectly.  Rating: A

Overall Rating: A (Not an average)

Click to enlarge

The original:


This last image is a print, you can buy it here:


November 19, 2011

Check out my rocks

More mountains means more rocks, so last night I mixed up a double batch of hydrocal.  My local hobby shop stocks a brand that comes with various pigments, I find this serves no purpose as my rocks will be painted long before I'm done, but it costs less then the woodland scenics product so why not.   That said, I'd recommend looking at plaster.com, as I wish I had known about them before I started.   

Anyhow, I made 10 moulds worth of rocks and let them dry overnight: 


This morning I attached these to the layout, using Surebond white glue.  I've had better results with this stuff then with a glue gun, and it's much less mess then trying to stick them on with new hydrocal, which has little tensile strength anyhow.


Don't let the wet glue scare you.  Next step will be casting and attaching more rocks, and then painting, which ill be a future post.


UPDATE:   Lots more rocks added, and a retaining wall too!


This is how the sausage is made, do not be alarmed, it'll clean up nice.